Co2 car project
Recently, we had a big project in Exploring Technologies, which was to determine our final grades. We were to make a co2 car out of a block of wood, and make it go as fast as possible. Our teacher told us that the speed is often around 30km/h, which for such a small block of wood, is surprising. The assignment was split into these several parts: Idea Sketch & Blueprint, Actual building, Report, and the racing. Our reports need to document all the things we have done, along with questions about the car. These questions include:
- What is co2?
- How does co2 make your car run?
- What are Newton’s three laws of motion?
- How are these applied to the dragster?
- What is aerodynamics?
- What are the four fundamental forces acting on an object traveling through air?
And more. Along with this, I had also started on some ideas for my car. I had three options: a firework car, a bullet car or a very very light car. Admittedly, the firework car would look cool, but I ended up pickign the bullet car due to it being more aerodynamic and having a good center of mass. Something like the firework car will have a lot of air built up in front of it and slowing it down.
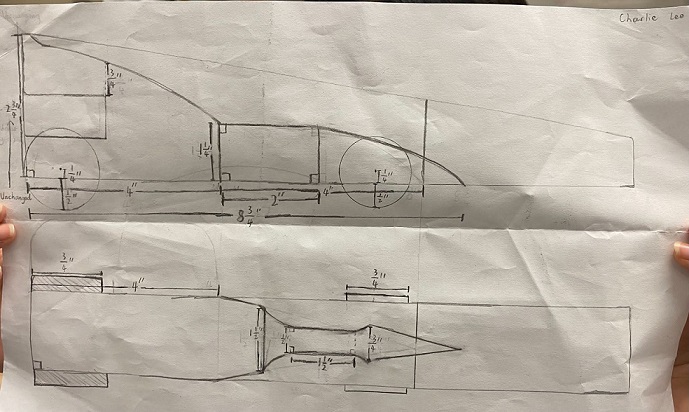
Above is the blueprint for my co2 car. The measurements need to be in inches, and therefore there cannot be any decimal points on there. Fractions were used to show more precise details. At the top, you could see my name.
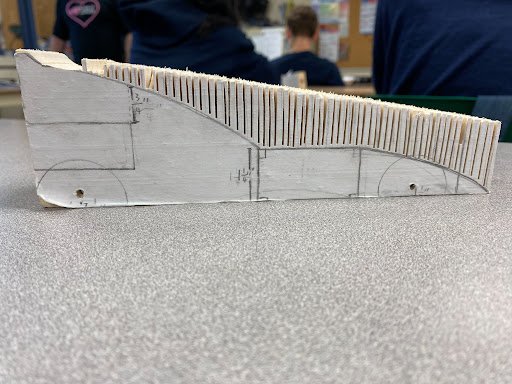
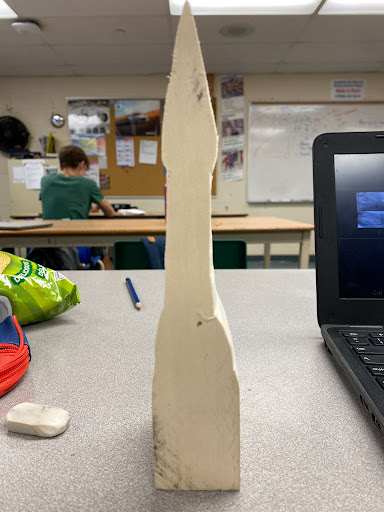
And with the planning done in around 3 periods (each period is 75 minutes), we were mostly all ready to go into the shop and start carving out our cars. We were taught how to do side relief cuts using the bandsaw, how to cut off the pieces with the scroll saw and how to sand our car with the belt sander. At first, things moved slowly due to everyone needing to use the band saw. To give you an idea of how much cutting we need to do, here is an image of my car. Keep in mind that my car was one of the shortest ones in the class.
After that, it was time to cut off all the little pieces. The purpose of relief cuts is to allow for the scroll saw to cut better. The band saw has a very big blade, but is not good for doing specific designs and shaping. That’s why we split the wood into very small pieces so the scroll saw, with has a small blade, can cut it off and trim whatever edges remain. We then use the belt sander to make the car smooth. There was a lot of machine marks left on the wood by the band saw and the scroll saw, and there should be no machine marks visible to the eye. That was one of the criteria. Below is my car after sanding:
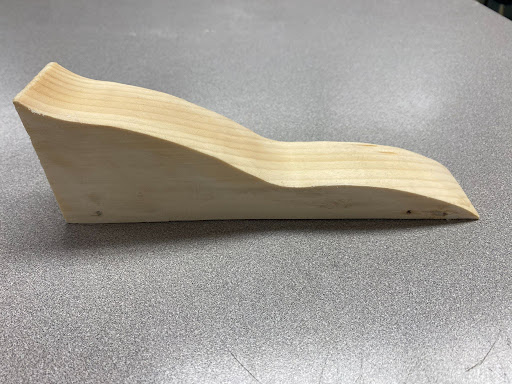
It was very smooth, and things were going well. Next, once I have shaped the car verticlly, I need to shape it horizontally. You can tell from the image that it doesn’t look like a bullet yet, and that’s what is coming next. However, due to I think both the drawings and the actual cutting, my car was a bit unsymmetrical. My relief cuts were a little too unconsistent, causing strange curves here and there.
 ,
, 
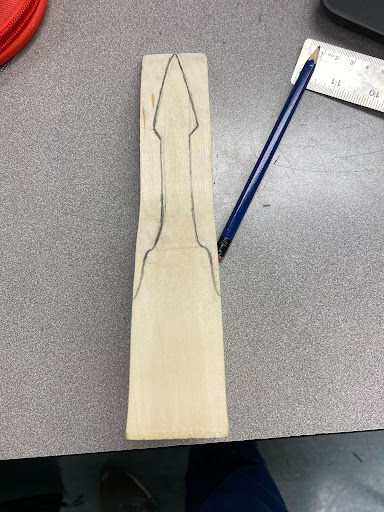
Symmetry was one of the criteria on the rubric, so unless your design is intentionally asymmetric (and even then it needs to be eye-pleasing), marks would be deducted for that. So, I needed to fix this. So, I tried to eyeball it and use the scroll saw to cut it without drawing eyes. This was not a good decision as I proceeded to cut in the wrong direction, making the car now look very asymmetric. Reflecting back, maybe if I didn’t fix my first mistake it may not have looked too bad. Now, this is what it looks like:
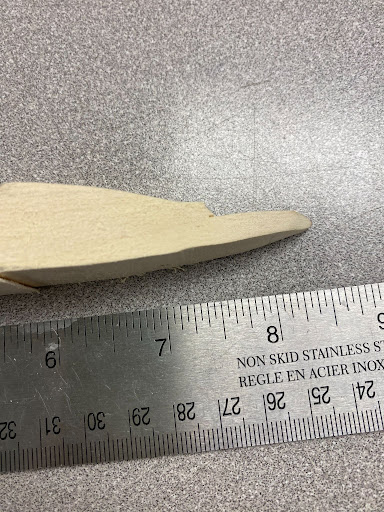
In the picture, you can see a ruler. And that is because I need to measure it. I had two choices: either cut the entire thing off, or do the same to the other side to preserve the symmetry. If I cut the entire thing off, it would go below 8 inches and I would lose marks. So, I had to do the exact same thing to the other side, making it a very very precise cut and having the tip be around 1mm. However, I actually did succeed in doing this, and managed to smooth out the other parts too. I had to manually sand the very tip because it will break if I use the belt sander. After that, it was time to apply paint. The important thing is to not apply too much paint, as that will slow down the dragster. This is the first layer of paint done:

And after that, I got the second layer done, using a custom silver made by another classmate. I really like the silver, so I had silver strips on top of the car. After that, our teacher set up a ramp for us to use, and we tested how fast it goes just by going down the ramp. Obviously, we can’t use up the co2 canisters yet, we need to wait for the race. And so, after a few days, everyone was ready for the race. I was going first against another classmate. My reaction time was a bit slower, but my dragster seems to have overtaken his. I thought I had won, but at the end, my car flew off to the left, and did not pass the finish line, resulting in a DNF (did not finish). The 1mm piece broke off as the car had a not so soft landing to the ground, and in the report, I made sure to document what happened. I explained how there was not enough downforce, and the car from the side looked like an airplane’s wing, making it fly up and miss the finish mark. I was pretty disappointed with the race results, but I did a good job on the report, putting in some alternative ideas that I had after I finished the race. If I were to do this again, I think I would go with an aesthetical car, maybe something like the firework would be cool to see.